Tuesday, May 31, 2011

Finished Quilt

I love this pattern, and would definitely do it again. It worked up nicely. I did attempt my first time at machine quilting. I'd say it was successful, but with many flaws. I think with a little more practice, I could do it better. I did a few doll quilts this week to practice my quilting on before I did this quilt, and the doll quilts looked much nicer. I found it hard to manoeuvre the larger quilt, and got quite a few "beaks" in my quilting. I also encountered some bobbin issues for a small part of it.

The pattern was called "Star Log Cabin". Love it!! I just HAD to do the stars in yellow, to make them pop. I was going for a light and airy feel on the colours... I'm always drawn to greens and blues, and thought it would be the perfect combo for this quilt. I like how it turned out. It's a lap size quilt (baby size).

JDS_7180

I backed it with a blue polka dot flannel:

JDS_7185

Here is a better view of my mediocre.... poor quilting job:

JDS_7186

JDS_7182

JDS_7187

I've decided to keep the quilt. I toyed with giving it away, or selling it, but I think due to the flaws, I would rather keep it for my own kids. I would say that it was for the baby, but Paisley has already tried to stake a claim on it. So I think it will be a shared household quilt.

Once I put binding on the doll quilts, I'll post those.... but that may be a while... have so many things on my to do list.

Monday, May 30, 2011

Pattern Test

I love when I get the opportunity to pattern test. It forces me to make things for my own daughter, and with a time line (I have lots of projects started for her, but not many get finished).

This pattern was the Reversible Skirt by Seamingly Smitten Patterns.

Here is a few photos of Paisley in the finished product. I love that it's reversible (great for spills when out) and I love the wave detail on the bottom:

JDS_7166

JDS_7167

JDS_7170

JDS_7172

JDS_7173

I was amazed that I even found 3 coordinating prints in my stash... I'm notorious for only buying things that don't go together.. and end up having trouble finding prints that go together when I need to.

Love the skirt! It's super cute, lots of growing room, and works up easily and quickly! The pattern is well written, and easy to follow, even if you were a newbie to sewing.

Paisley is smitten with her new skirt, she wore it all day the day after I made it. She keeps asking if its clean yet (I'm behind on laundry right now).

Such a cute pattern. I know I'll be making several more of these for my girls over the coming years!

You can buy this and other Seamingly Smitten patterns in her Etsy shop Seamingly Smitten Etsy as well as on You Can Make This (this pattern isn't up on YCMT yet, but her other patterns are).


Wednesday, May 25, 2011

Crafty To-Do List

Ivwas working in my craft room this weekend.. making it usable... so you'll see a theme this week ;)

This crafty storage crate is a great idea!! Totally making one for my current crochet projects and my crochet hooks. I have a former roommate that left a milk crate behind a long time ago. This tutorial was posted by My Patchwork :


I'll admit, I saw this tutorial last summer, and already started it. But my to-do is to finish it! This thread holder by Sugar Bee Crafts is perfect for an organized craft room. The only thing left for me to do is glue the dowels in the holes... but i haven't touched it in a year. I am determined to finish that in the next couple weeks!


Ribbon storage...the eternal problem for me. I was thinking of doing something like this, but on a larger scale. Ribbon storage tutorial by Scrapmasters Paradise:


I actually might do this ribbon storage instead.... my hubby pointed out that I never sit at my desk to do hair clips... so it'd be better to just be able to grab the spools I need, and not have them on a dowel. This ribbon storage was on Nichole Heady's blog (Papertrey Ink).


I just have some paper filing to do and I can take pictures of my craft room. Still need to get a few more storage solutions, but it's definitely a functional room now! :)

Thursday, May 19, 2011

Glass Etching

Glass etching is something I've been meaning to do for a LONG time. I bought my etching cream about a year ago, with good intentions. I finally got around to doing some etching. Perfect excuse: a wedding gift.

A friend of mine recently got married (remember the ring bearer pillow, and flower girl accessory). She loves to cook. She's a good cook! Well for her gift, we bought her a big set of pyrex dishes with lids. Perfect for the one who's always cooking for others. I decided I wanted to etch her new married name on the bottom of all her dishes... so that, generous person that she is, she always gets her dishes back when she brings food to people.

The process is super simple, and I'm not sure why I put it off so long.

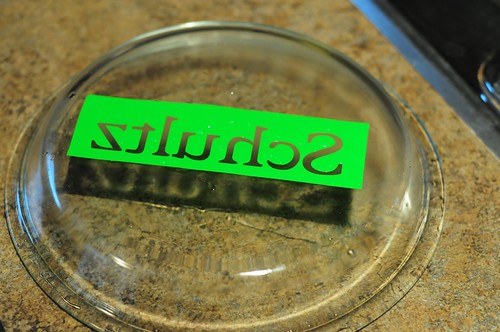
First step is to decide what you want it to say. Then, using your Cricut, you type it in, in reverse order, with the Flip function turned on. Cut it the size you want on vinyl.

Then take some transfer tape... and transfer the stencil to the pan you want (I tried with out transfer tape, because I thought I was out... and it was disastrous. It worked.. but it was kinda sloppy, and hard to get the letters nice).

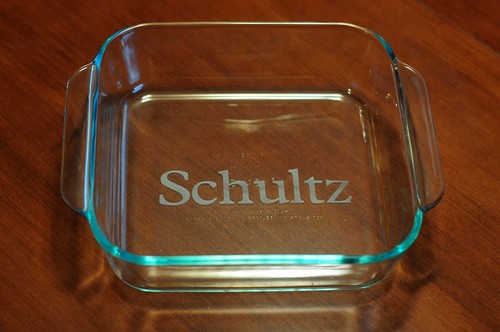
So it looks like this:

JDS_7143

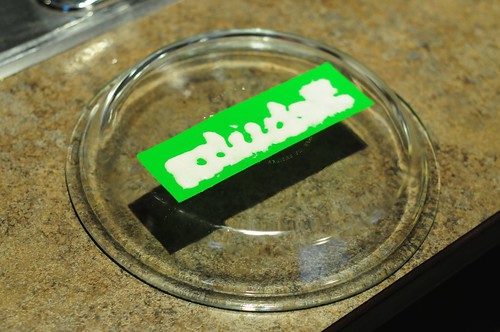
PUt the etching cream on thickly, and let sit for a few minutes (says 60 seconds on the bottle.. but I let it go extra long).

JDS_7141

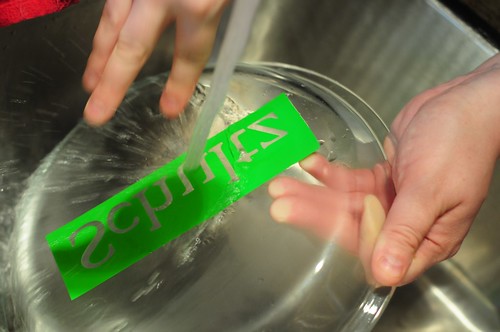
Rinse off the etching cream (you can actually scrape most off and put back in the bottle to reuse, I'm thrifty like that).

JDS_7142

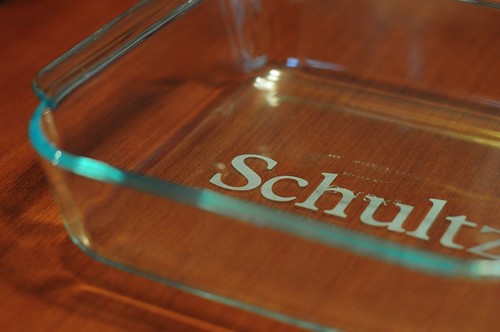
Peel off the vinyl, and Voila!

JDS_7138

JDS_7139

Super simple... I'd love to do this with some designs, etc on my own dishes.

So many great ideas and designs out there on the web. Vases, glass kitchen storage canisters, cake stands/covers.... I'm definitely going to play. You can also use it on mirrors.

I still haven't given it to the bride... eek. I have them coming over this weekend though... so hush... don't tell them I posted their gift here ;)


Thursday, May 12, 2011

Crafty To-Do List

More to-do's. I better get tackling some of these!

TOTALLY need to make these Sponge Water Bombs! They will be perfect for the summer months, and water fights between toddlers. Found this tutorial on Positively Splendid's Summer Survival Guide:


Pants! We definitely need more pants around here, especially for playing outside, and ones that are easily pulled up and down for pottying (jeans have posed a problem lately). This kid pants tutorial looks fantastic! I love that she's added additional tutorials for lining, pockets, and flat front. This tutorial is from MADE:


Now how fabulous is this pillow? I absolutely adore it! I honestly don't have the style house that would suit it... but it makes me wish I did! This tutorial is by Suzanne at Just Another Hangup :


I bought a jelly roll the other day, and came across this quilt pattern while searching for ideas on how to use it. I love this quilt... so I think this will be my next quilt project. It's called Sugar Pop N Change. I found it on the Moda Bakeshop Blog. The pattern is by Melissa of Happy Quilting :


Just what I need! Right now my crochet hooks are in a canning jar. I have a hook roll up, but unless I'm travelling, I find it tedious to use. Perfect solution! These denim bins are by Betz White, and found on the Craft website.


Are you proud of me? For once there's nothing too girly... ;)

Wednesday, May 11, 2011

Feeling Gnomey

I was feeling inspired the other night, and whipped up this gnome hat for my daughter. She woke up while I was making it, so I got to try it on her, and she was excited about it. She loved it. I told her I was going to put white polka dots on it, and she very strongly said she didn't want WHITE polka dots.... she wanted RED polka dots. After trying to explain that red polka dots on a red hat wouldn't work, I tucked her back in bed, and went back to add polka dots.

This morning I tried it on her, and she was NOT happy that I had put white polka dots on it. I had hoped she had forgotten. She declared she didn't like the hat (You just can't win with a 2 yr old). She did let me take some pictures of her in it..... but she was goofy and not holding still at all.

Anyway.. here are some pictures of the reluctant model in the hat. I think the hat is adorable. Not sure if it's one we'll list in our shop or not... undecided, but it is cute! I might increase the number of polka dots on it....

JDS_7032

JDS_7030

JDS_7028

JDS_7029

Saturday, May 7, 2011

Quilt Progress

I've completed 3 classes in my quilt class now.... I didn't do all my homework for this morning's class, but hoping I can get by. Here it is so far.... but I'm off to my 4th class in about an hour....

JDS_7008

I love how it's turning out. I'm nearing the completion of the top.... I'm going to guess that with today's class, and homework assigned this week, that I will have the top done for next wee (still need to do the frame, borders, and the border stars).

Thursday, May 5, 2011

Crafty To-Do List

This toddler bench is brilliant. My daughter is constantly hauling stools, and the chairs to her little table around the house. She likes things that are just her size. This tutorial is found on The Mother Huddle.


This fold up picnic blanket is a great idea! Posted by Ikat Bags:


I NEED some maternity clothes... I've gotten to the point where even my longer maternity shirts are getting too short. So the next two projects I want to do ASAP for me! But are ones that I can reuse the fabric for toddler clothes after.

Maternity skirt tutorial posted on See Mommy Sew:


This top tutorial will be easily adjusted to a maternity top. Perfect for summer! I found this tutorial on Sew Mama Sew.


The final project I would like to do is a teepee for the kids. Something fun they can set up in the living room on occasion. This fabric teepee is posted on the Robert Kaufman site:


Monday, May 2, 2011

May Project of the Month

I've had this fabric in my stash for a while.... I love it!

Well this month I'm doing a project for me.... all for me! :) I'm hoping to get it done this week... cause I want it NOW! :)

IMG_1633

Isn't it pretty?

Sunday, May 1, 2011

April's Project of the Month

Completed:

JDS_6964

JDS_6974

This is the Kyoko dress by ModKid

I made a size 4 for Paisley, since she's in a small size 3 now... and she'll get more wear out of it then. If you take the sash off though, I think it will actually fit her til she's like 10 years old as a top... it's pretty wide through the bodice. It's gathers up nicely beneath the obi (sash)... so making a bigger size is great!

I completed it last week in time for her to wear it for Good Friday. She wore it to the wedding rehearsal that evening and out for dinner (unfortunately it was Chinese food, not Japanese).

The pattern was easy to follow, and is so adorable on! I let Paisley choose between the shirt vs dress option, and the long sleeve versus long sleeves (all are options). Normally the part below the sash would be panelled with different fabrics, but since I've had this teapot fabric for so long, I didn't have any coordinating prints to put with it, so I just did 2 panels of the same fabric, and removed the seam allowance for all the extra panels. Super cute, and she loves it :) But she wants chopsticks in her hair! She needs a little more hair first ;).

 If I get time over the summer, I'm thinking I'll make a limited few of these for the shop... so if you have any colour/fabric or size requests... let me know :)

Will be posting my preview for May's project this evening... haven't decided what it will be yet!

Check this out.... Kyoko is now released for tweens and adults! : http://modkidboutique.blogspot.com/2011/04/introducing.html